LOD TECHNICAL INFORMATION
On this page we list some of the recommendations and techniques to use when creating your LODs, whether it's for scenery, an aircraft fuselage, or a cabin interior. This information should be used in conjunction with the information on the following pages so you can create LODs that are correct and optimised for Microsoft Flight Simulator 2024:
General Recommendations
When it comes to modeling your LODs, the following general recommendations should be observed:
- When doing the modeling, you should always try to create the model according to the closest distance from the user point of view that the LOD is supposed to be seen. So, while modeling, zoom out regularly to observe the model at the maximum size on screen that you expect it to be seen from.
- Where possible, reduce the material and texture count as you move from the high definition LODs to the lower definition LODs. You should re-use textures across LODs where possible.
- Only make the the minimum number of LODs the object requires based on what use it will be put to, and never exceed 7 LODs (so LODs x0 to x6). Guidelines for the number of LODs to create are given in more detail in the LODs Count section, below.
- We recommend tweaking your LODs in the "High" quality setting of the simulation, which is neutral for the LOD Selection System.
LODs Count
When it comes to creating models for the simulation, we can't give precise LOD counts for asset types as it will depend on the complexity of the model, the use it will be put to, and the closest distance to the camera at which it will be visible (under normal circumstances). However we generally recommend between 2 (for something like a traffic cone) to 5 (for something like a light aircraft) LODs, and even up to 7 LODs in those rare cases where a lot of detail is required or the object is very large (like an airliner).
When modeling and testing, if you think your object requires more than the recommended LODs, it is almost always because the LODs optimisation is insufficient, or because the object is too complex and should be split into multiple parts using either SimProp Containers (scenery), or Sim Attachments (aircraft).
When following the LODs modelling guidelines given below, each next LOD will be at least 50% the polycount of the previous LOD, although this is more commonly 30% - 40%. This way, the final number of LODs will almost always be between 2 and 6, and the LOD Selection System will not switch to a lower LOD before appropriate the camera is at the appropriate distance.
NOTE: numbers like polycount or the ratios between different LODs, can be a bit of a "trap". It often happens that artists try to reach the approximate Vertex Count Limits and then stop optimizing. We do not recommend this! LOD optimisation is good not when a specific number is reached, but when no more vertices can be moved or removed without clearly loosing the shape of the model at the maximum size on screen it is supposed to be seen. Working this way will ensure that the polycount is always below budget.
LOD Creation Flow
The following is a guide to LOD creation based on the flow that the Microsoft Flight Simulator 2024 use. You do not have to follow this, but we provide it here for reference to help you get the most from the simulation.
NOTE: This suggested guide is written for modeling single objects, but - in the case of modular SimObjects - you would do this process for each attached part, and then test them altogether in the sim, keeping in mind that you can have more detail per LOD since they will be switched independently.
LOD0
Make sure you are happy with your high definition model (LOD0) in terms of shapes, proportions, and textures, and check that your model is optimal in terms of vertex count by closely following recommendations here: Modeling Technical Information. It is important to start from a perfectly optimized model to make LODs, since insufficient optimisation will propagate to the next LODs created.
LOD0 > LOD1 (Simplified)
Once you have an optimised LOD0, we suggest that you then go to the most simplified version of the object for LOD1. This would be the simplest possible LOD, which should not exceed 150 vertices, which is the minimum number of vertices an object can have before it will be removed by the engine from display based on distance from the camera.
The next step is to integrate your model with the two LODs into a package, setting the minSize of LOD0 to 1 and minSize of LOD1 to 0. You can then test in the simulation and see at which distance the LOD Selection System swaps from LOD0 to the LOD1. There are three general things that can be observed here:
- For most objects of any complexity, the swap will be much too visible because it will happen too close to the point of view of the camera. In these cases you can move on to the next step of modeling.
- If the object is only of minor complexity, then you may notice that the swap is not so bad, and is almost good enough. In these cases you should double-check the LOD0 model and see if you can reduce the polycount further. The idea here is that maybe you can save enough vertices to make your LOD0 display farther from the camera, which would be just enough to make the swap less noticeable and work in the simulation. Note that sometimes you can also add a few vertices to the LOD1 model to soften the transition even more. If this is good enough then your work is done.
- In some very rare cases - usually only when creating extremely simple scenery props with simple shapes - the 2 LODs are sufficient and no more work needs done.
LOD0 > LOD1 > LOD2
Having determined that two LODs is insufficient, you will need to continue with the creation of another LOD level. For this we'd normally rename the extremely simplified LOD1 as LOD2, and then continue on to model a more detailed LOD1. Sometimes you can actually base LOD1 on the simplified LOD2, as adding details can often be faster and give better results than spending hours in simplifying the complex geometry of LOD0. However this approach is not guaranteed to work, and you will have to start from LOD0 and optimise to make LOD1, in which case we suggest the following:
- Create your LOD1 from LOD0 and export all three LODs.
- Add them into the simulation test package and then see at which distance the LOD Selection System swaps between the three LODs (make sure you have set appropriate minSize values).
- If the LOD0 > LOD1 transition is still too visible, then you have two potential paths:
- If the transition from LOD1 > LOD2 is fine, then it may be that you have some margin to add detail to the LOD1 to make the transition with LOD0 smooth enough to be fine.
- If the LOD1 > LOD2 transition is not fine, then you will have to model a new LOD1. The steps for this are given below.
- If the transition from LOD0 > LOD1 is fine but LOD1 > LOD2 transition is much too visible, evaluate and see if you can reduce details on LOD1 to move the swap to LOD2 further from the camera, without breaking the transition from LOD0.If this is impossible, then you will need more LODS, explained below.
LOD3+
Having worked out that you need more than the minimum number of LODs, you can continue to work on adding further LOD transitions, where:
- For any transition between LODn and LODn+1 that you do not consider as smooth:
- First try to simplify LODn such that the swap to LODn+1 will occur further from the camera.
- If this is still not satisfactory, then try to add some details to LODn+1 and soften the transition.
- If you are still not happy, it's time to add an intermediate LODn by simplifying LODn-1 or by adding details to LODn+1.
- Repeat this process until all transitions are fine, but note that you cannot exceed the maximum of 7 LODs. If you think you need more LODs, you are doing something wrong and need to reconsider how you have modeled the LOD0 and how much detail you actually need for the model.
NOTE: Each time you think your LOD is pretty good and matches the recommendations, take a few minutes to look at the model in the simulation at the closest distance it will be displayed. Enable one or more of the debug display options (like LOD Screen Size or LOD Face Count, for example) and ask yourself if the number shown is fair for what you actually see on screen. Often this number is beyond what you would expect objectively, which is good since it means that you can probably remove some details that you considered useful but are not.
General LOD Modeling Guidelines
The most obvious thing to check before creating any LODs is that the base model (LOD0) is as optimised as possible. This may seem obvious, but if this part is neglected then all the derivative models for LODs will inherit the weaknesses of the base model and will require more time and effort to simplify. You can find some helpful hints on modeling from the following pages:
A good habit to get into consists in modeling objects with a lighter polycount than you may think necessary, and then review the object in the simulation, paying attention to things that can be improved while remaining under the recommended limits. Doing things this way means you are only adding the vertices and the textures that the object really needs.
This is explained in more detail here - Model According To View Distance - but it's worth mentioning again that while modelling, zoom out regularly to observe your LOD at the approximate closest distance you expect it to be seen in the simulation. When vertices or edges are so close to each other than they blend together, it means that you can simplify.
Remove Geometries, Don't Simplify
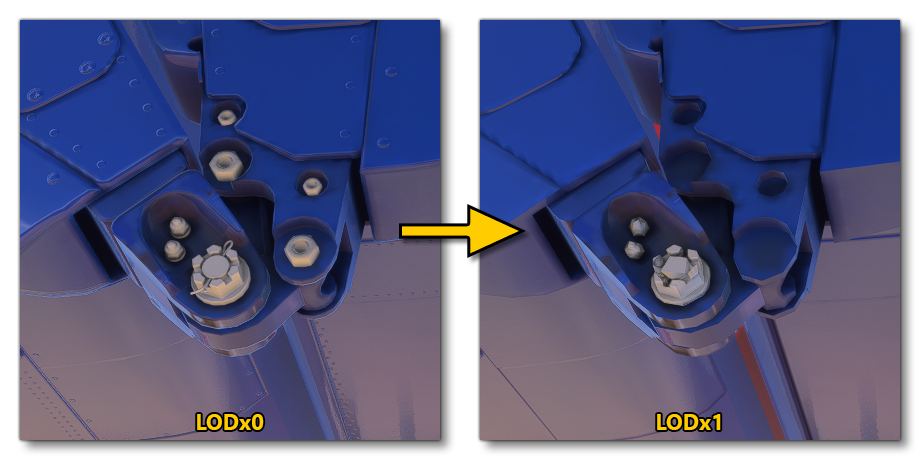
In general we recommend that you remove all details and small objects that will be barely visible at the closest distance you expect the LOD to be displayed. This is much faster than simplifying every single part / detail of the model. Once the model is being tested in the simulation, you will may notice some details that should not have been removed and you think you should keep and optimize them, but often, you'll be happy to see that the removal was the correct decision and saved you optimisation time.
Optimize Consistently
Below is an example of a large complex model made up of a large sub-model and a few smaller sub-models, however on a certain lower LOD some details of the large sub-model remain more detailed than the rest of the mesh or other sub-models:
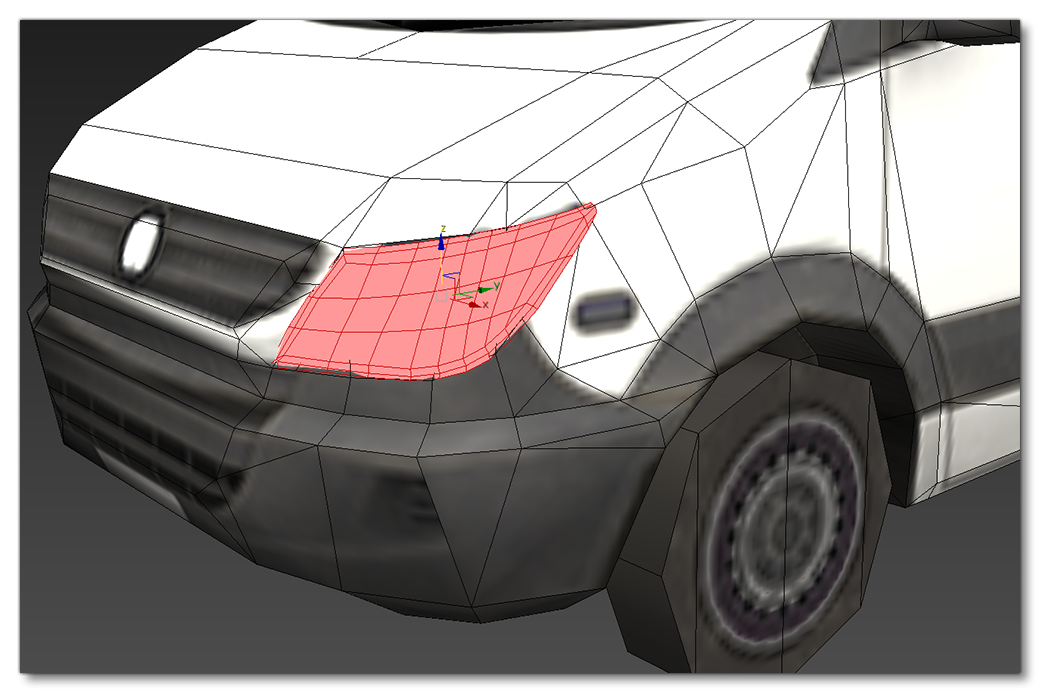
It is important to decimate the entire sub-model down to lower polycount meshes consistently when creating LODs. This goes for any sub-objects that are used in the model too, as shown in the next image where the sub-model of the wheel remains with the same polycount as the previous LOD even though the main sub-model has been reduced:
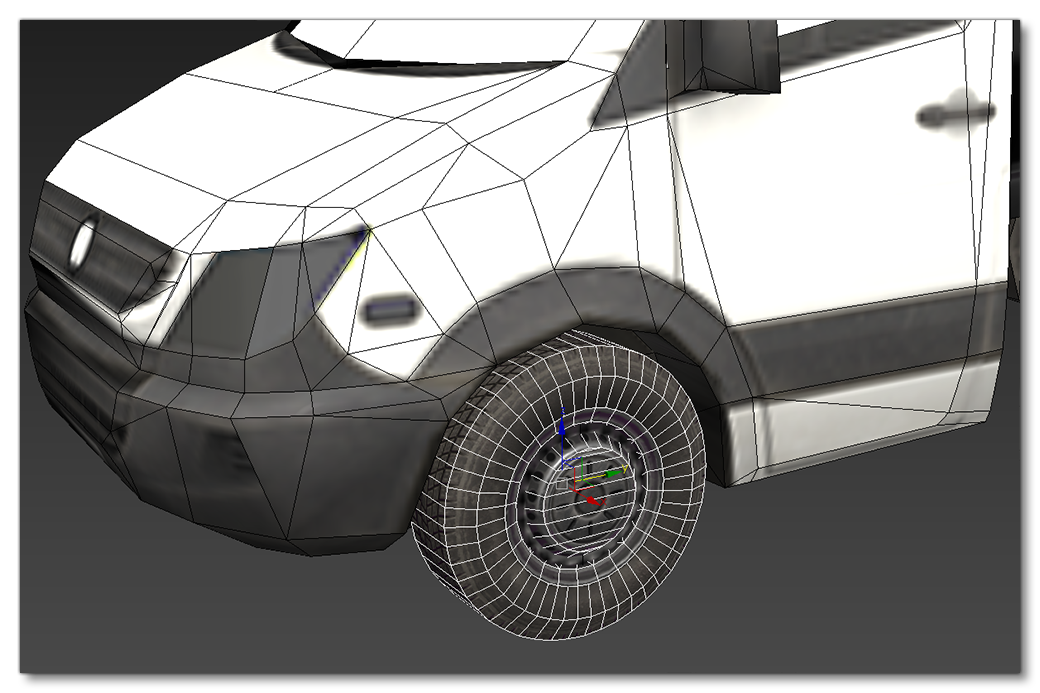
The take-away here is that after completing any LOD, you should still take a moment to check that every part of the mesh geometry is optimized from the previous LOD.
Rounded Surfaces
On rounded and organic meshes - especially if a material with a high specular level is applied to it - you will probably see shading "jumps" on the geometry surface as the normals change with the LOD polycount reduction. It is therefore important to reduce vertices by priority:
- the geometry on the flat shapes first, since you can get huge reductions here.
- then reduce the geometry on the curved elements second, where you can be more conservative.
Automatic Optimisation Tools
There are numerous automated tools that may seem efficient from a time-saving / cost-killing perspective, but in general these are never going to be as efficient, nor give the best results, as manual optimization. Consider the shape below:
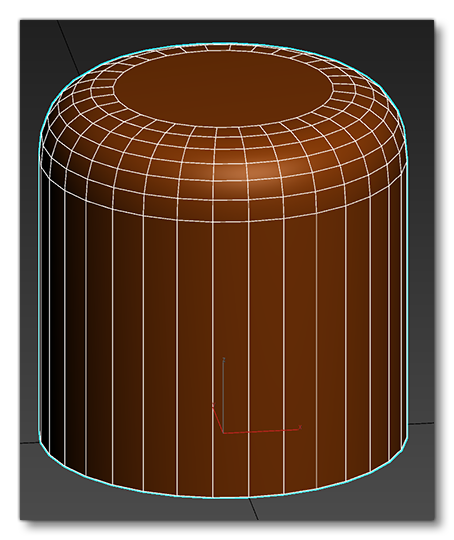
You have the option to automatically decimate the vertices on this using one of the tools in your modeling program, or you can manually reduce the vertices. The image below shows the two different results:
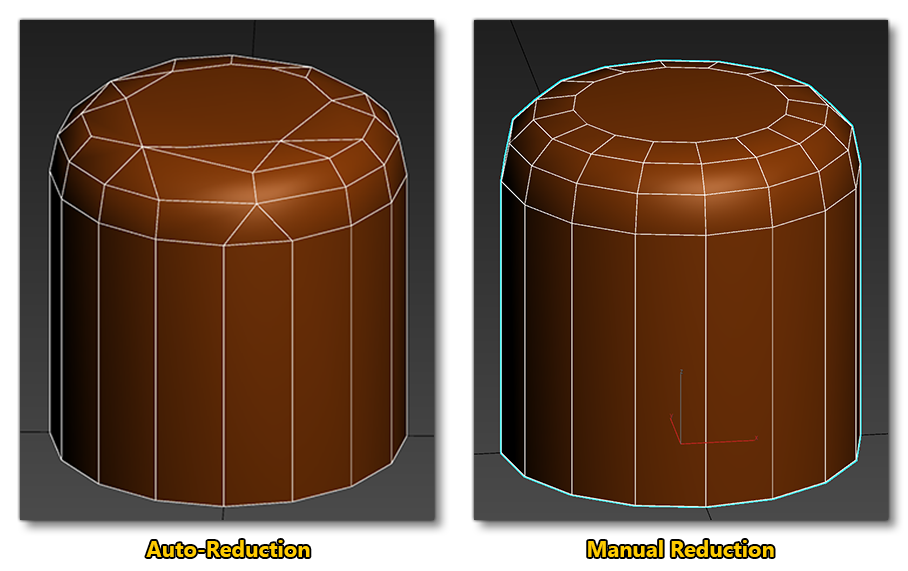
Superficially, the auto-reduced version doesn't look too bad and actually has less polygons than the manual reduction, even if it's only a few less. However, the shape has been distorted (something that will only get worse as you further reduce LODs), and the geometry will cause issues in the simulation when it is rendered, something you can see in the modeling program if we remove the wireframe overlay:
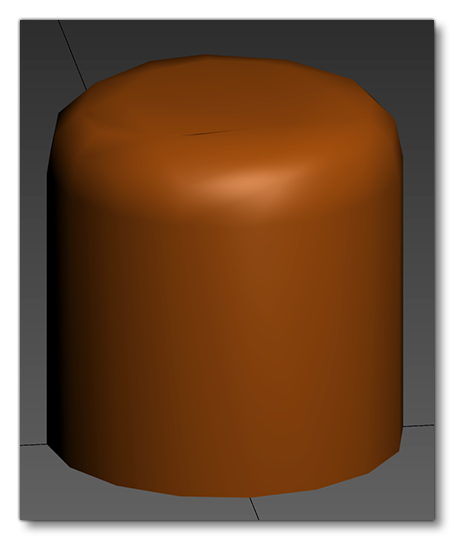
As you can see in the image above, there are shading issues, and the object silhouette is very rough looking and not ideal. So, there is a place for automated tools to reduce polygon count, but great care must be taken when using them, otherwise they can be very problematic.
Remove Minor Faces
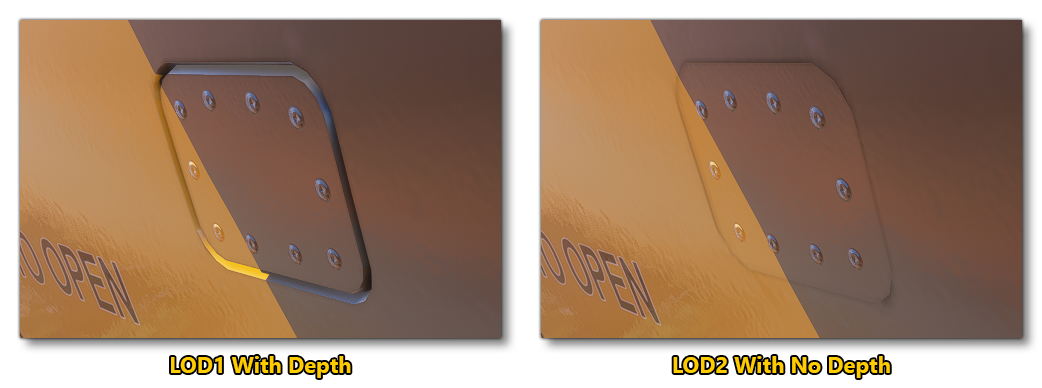
It often happens that there are minor faces in a model that get missed when they are part of a very thin sheet (like a metal stand) or part of a recess (like the chamfer around an oil trap door). However, these are precisely the areas where you can get a simple, easy, and cheap reduction in polygons, as most of this kind of "depth" modeling will not be visible after LOD1, and can either be flattened completely or flattened and simulated with textures, for example:
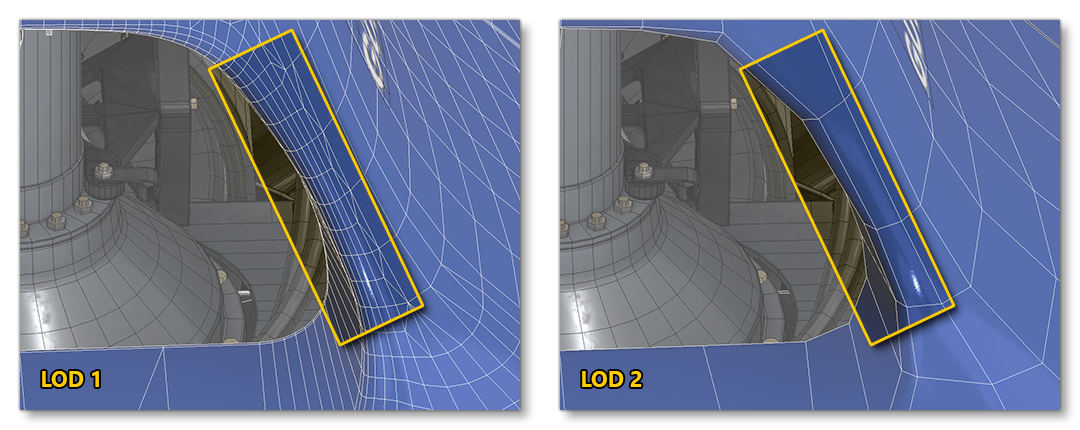
This rule is the same for any object that has chamfered or filleted edges. Unless these are part of a large-scale object, they can almost always be removed after LOD1, for example, the filleted edge of this engine port has been greatly simplified between LOD1 and 2:
Optimize Interiors More Than Exteriors
The interior of most buildings, as well as the aircraft cockpits, holds of boats, etc... quickly become barely visible as the distance from the object to the camera increases. So they are typically the kind of asset that can have far fewer LODs, and those LODs can have a more drastic polycount reduction from one LOD level to the next. Often you only need the detailed LOD0, and the highly simplified last LOD. For example, the interior containers of this boat can be simplified down to a few rectangles for LOD1:
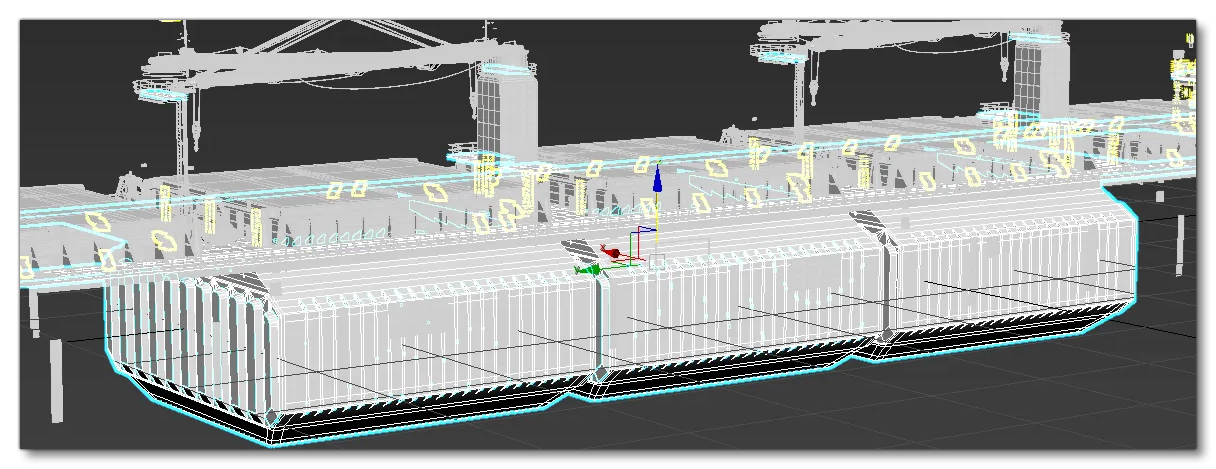
It is also worth noting that in some cases you can use Modelbehavior Templates to hide interior parts according to closed or open doors state, or other factors, further optimising the polycount for the object.
Related Topics