DOORS, HATCHES, AND CANOPIES
This section goes through the steps required to correctly model the various animated doors, hatches and canopies on an aircraft so that they can be used correctly in the simulation. For aircraft in Microsoft Flight Simulator 2024, this is an essential part of the modeling process as opening and checking things is required for setting up a correct Preflight Check. Specifically the following items need to be correctly modeled and animated:
- Doors/Canopies (for passengers, crew, cargo, etc...)
- Hatches (for the APU, baggage handling, avionics, etc...)
- Engine compartments
- Fuel caps
- Oil caps
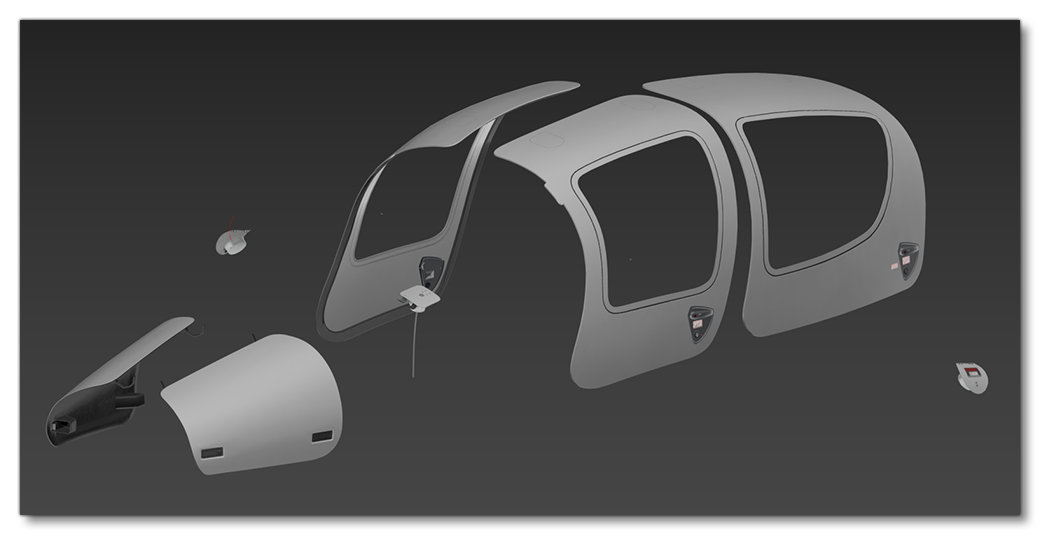
The following image shows all the door and hatch elements of the DA62:

Modeling
Depending on what you are modelling you will need to model both the interior and the exterior separately or altogether:
- Doors and canopies that go from the exterior to the interior (ie: a passenger door) should be modeled in two parts, with the exterior being part of the
exterior.xmlfor the airframe, and the interior being part of theinterior.xmlfor the cabin or cockpit. These should be designed to match up perfectly when the two models are combined in the simulation.

- Hatches/compartments/caps are modeled as part of the exterior only.

When modelling the exterior of the doors and hatches, all the general modelling rules apply, and you will be using the either the Standard or ClearCoat materials for the solid parts, and the Windshield material for any parts that are transparent. Setting up these materials for use is explained on the following pages:
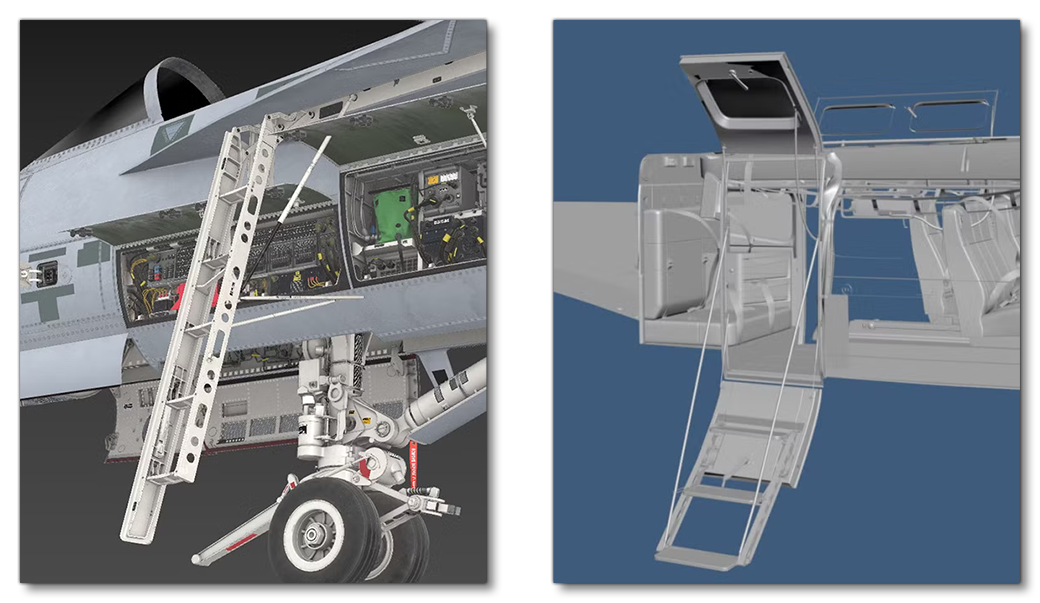
When modeling these things, do not forget to add in the relevant details, like decals, rivets, interior spaces, etc... If the door or canopy has a handle and lock system, then these will need to be modeled in such a way that it can be animated as well. If the aircraft also includes it's own ladders then these should be included as part of the model and animated along with the door/canopy.

Animation Setup
When it comes to animating the doors, canopies and hatches, the number of frames required for each one will depend on the purpose of the opening and should be logical and consistent with the "real" world. For example, an oil cap cover may only need 5 frames to open, but a door may need 100. For the animations themselves, it is important to note that doors and canopies are animated on all LODs excluding the very last one. So it is recommended to animate helpers and make the doors/canopies children of those helpers, keeping in mind too that interior and exterior animations must be identical:
- The exact same number of frames
- The exact same interpolation between frames
- The exact same position within the cockpit and airframe files
If the doors, canopies and hatches (for example a luggage compartment) have handles, then the animation should start with the handle turning/opening and then the door itself opening.
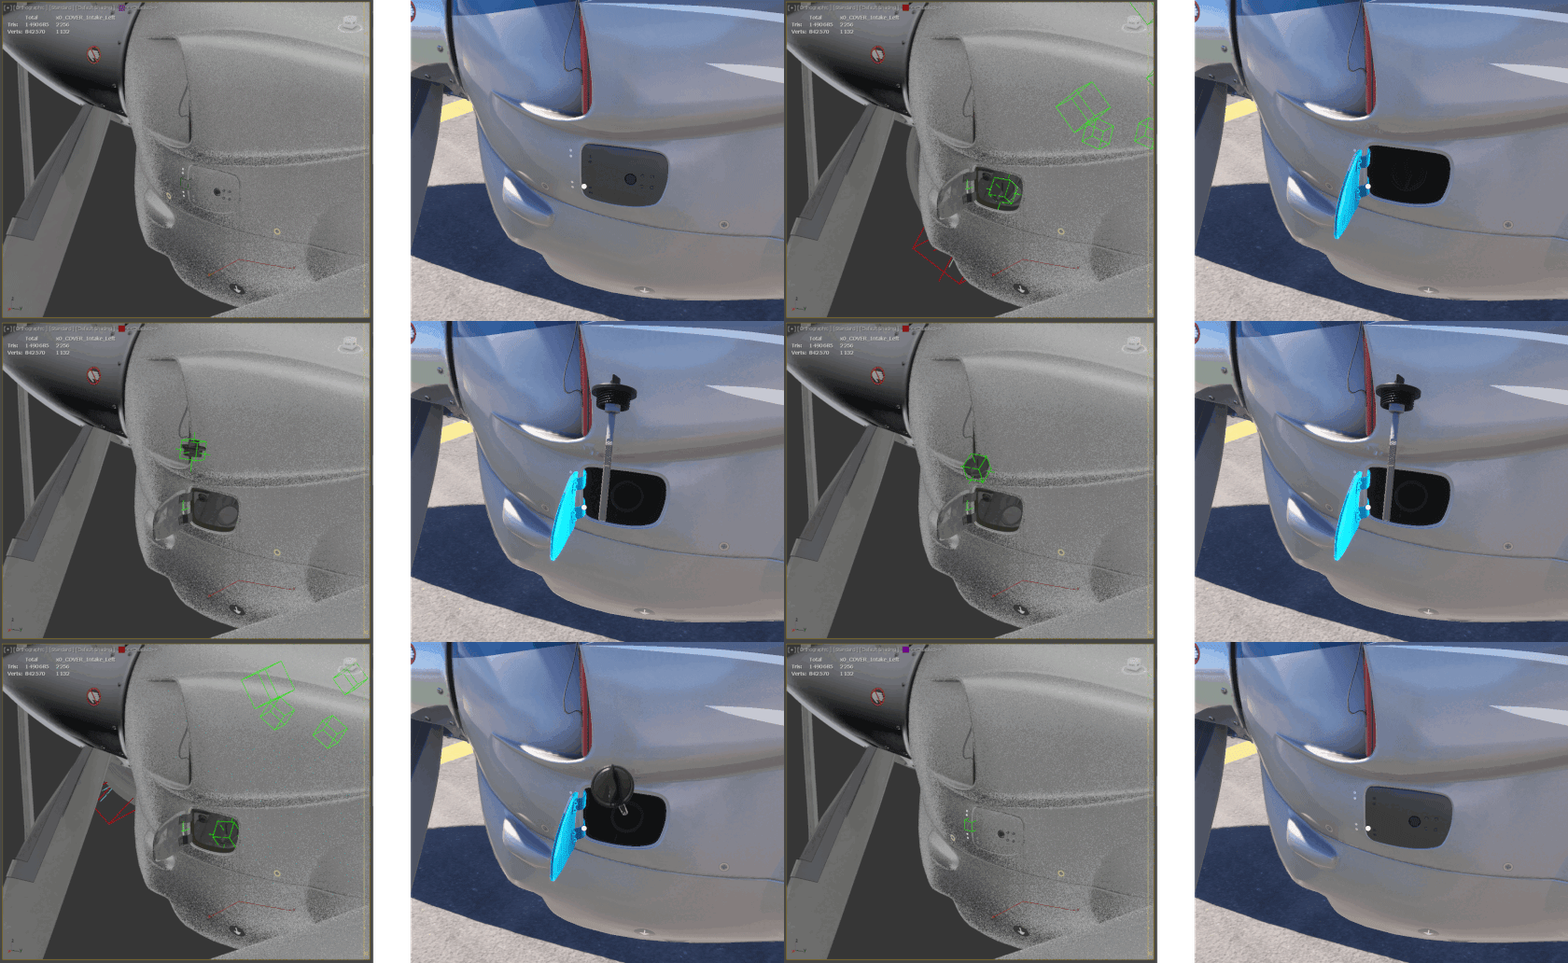
If the hatch is covering an oil or fuel cap, then the hatch should open, then the cap should turn, and then the cap should move up and out of the way. Of special note here is the oil cap which should also have a helper node as it will need to receive an attached object as part of the Preflight Setup so that it can show the oil dipstick (which does not need to be modeled and is only shown in the image below to give artists a guide for the positioning of the animation). The helper node should be in the center of the cap.

Animation Groups
Once you are happy with the animations they will need to be added to animation groups using the Babylon Animation Groups window, ensuring that you have the helper hierarchy correct along with the number of frames. In the image below, you have a luggage hatch with two levers that open it, and you can see how these have all been set up in the exporter:

File Setup
Having exported the models they will need to be setup correctly within the aircraft package. This will require a combination of the flight_model.cfg and Model XML. Where these files go will depend on the setup of the aircraft (see Modular SimObjects for more information). Files will need to be setup to fulfill two different purposes:
- Interaction with apron services (for passengers, ramps, crew, etc...).
- For preflight checks so the pilot can enter and leave the aircraft.
The opening/closing of doors for preflight checks is covered in the Preflight documentation, so here we'll concentrate on setting up doors to interact correctly with the different apron services. To start with you will need to assign an interactive point to each door that can be opened and needs to interact with the simulation. So, one for each passenger door, one for each cargo door, one for the fuel trap hatch, etc... (note that oil and gas caps do not need an interactive point, only their hatch covers). This is set up in the [INTERACTIVE POINTS] section of the flight_model.cfg file. For example:
[INTERACTIVE POINTS]
interactive_point.0 = Name:GasTrap #Properties:0,0.628,-30.871,-2.5,3,0,0,-90,0,0,0,0,0,0
interactive_point.1 = Name:DoorFrontLeft #Properties:0,0.628,-10.871,-2.5,1,0,0,-90,0,0,0,0,0,0
interactive_point.2 = Name:DoorFrontRight #Properties:0,0.628,-30.871,-2.5,1,0,0,-90,0,0,0,0,0,0
interactive_point.3 = Name:DoorBackLeft #Properties:0,0.628,-30.871,-2.5,1,0,0,-90,0,0,0,0,0,0NOTE: This part is usually easier to setup in The SimObject Editor as you can place points directly in the simulation using The Edition Gizmo.
You will want to place the interactive points for doors at the base of the door, and for the oil and fuel hatches, place them in the center of the models.
Having set up the interactive points, you will then need to set up the model files so that the doors are animated correctly. This will use the ASOBO_ET_COMMON_Interactive_Point_Animation_Template and look something like this:
<Include ModelBehaviorFile="Asobo_EX1\Index.xml" />
<Include ModelBehaviorFile="Asobo_EX1\DefaultConfig.xml" />
<Include ModelBehaviorFile="ASOBO_EX1\ExteriorDefs.xml"/>
...
...
<Component ID="INTERACTIVE_POINTS">
    <UseTemplate Name="ASOBO_ET_COMMON_Interactive_Point_Animation_Template">
        <POINT_ID>'interactive_point_name'_n</POINT_ID>
        <ANIM_NAME>name_of_anim</ANIM_NAME>
    </UseTemplate>
</Component>
Here you simply replace the name_of_anim with the name of the associated animation group and give interactive_point_name the name of the associated interactive point. A full example would look like this:
<Include ModelBehaviorFile="Asobo_EX1\Index.xml" />
<Include ModelBehaviorFile="Asobo_EX1\DefaultConfig.xml" />
<Include ModelBehaviorFile="ASOBO_EX1\ExteriorDefs.xml"/>
...
...
<Component ID="INTERACTIVE_POINTS">
    <UseTemplate Name="ASOBO_ET_COMMON_Interactive_Point_Animation_Template">
        <POINT_ID>'DoorFrontLeft'_n</POINT_ID>
        <ANIM_NAME>DOOR_OPEN_1</ANIM_NAME>
    </UseTemplate>
</Component>
You can also list multiple animation groups if required, for example, here is the setup for a small aircraft with 4 doors:
<Component ID="INTERACTIVE_POINTS">
    <Loop>
        <Setup>
            <Param>ANIM_NAME</Param>
            <Value>POINT_ID</Value>
            <Parameters>
                <OPEN_CABIN_DOOR_LEFT_FWD>DoorFrontLeft</OPEN_CABIN_DOOR_LEFT_FWD>
                <OPEN_CABIN_DOOR_RIGHT_FWD>DoorFrontRight</OPEN_CABIN_DOOR_RIGHT_FWD>
                <OPEN_CABIN_DOOR_LEFT_AFT>DoorBackLeft</OPEN_CABIN_DOOR_LEFT_AFT>
                <OPEN_CABIN_DOOR_RIGHT_AFT>DoorBackRight</OPEN_CABIN_DOOR_RIGHT_AFT>
            </Parameters>
        </Setup>
        <Do>
            <UseTemplate Name="ASOBO_ET_COMMON_Interactive_Point_Animation_Template"/>
        </Do>
    </Loop>
</Component>
Oil Dipstick
As explained in the Animation Setup section, your aircraft should have an animation showing the oil cap being unscrewed and moving up and out of the way of the engine, but it should not have a dipstick attached to it. This is because the SDK provides you with the means to use the Included DipStick Attachment, which is all setup to display correctly in the simulation. To use this attachment, first ensure that the model has an attach point in the oil cap and that it's parented it to the correct node.
Once the animation is done, there is nothing further needed in the model, but you will then need to set up the attachment using the attached_objects.cfg in the appropriate common, preset or attachment folder (depending on how you have set up your Modular Aircraft SimObject). In this file you will need to use the following:
[SIM_ATTACHMENT.0]
attachment_root="SimAttachments/Aircraft_Objects/Asobo_Oil_DipStick_615"
attachment_file="model/Oil_DipStick_615.xml"
attach_to_model_minsize=0
attach_to_node="node_name_of_your_attach_point"
alias="OilDipstick" ; you can write the name you want
behavior_parameter.0="OIL_CAP_ANIM_ID,'anim_name@part_containing_the_anim'"
Where:
anim_name= the name of the animation of the oil cappart_containing_the_anim= the sim attachments alias of the part which contains the animation
To give a more concrete example using DA62 you will want to hide the oil dipstick when the hatch is closed, and only show it when it's open. You have noted that the Babylon animation group for the oil cap is called "oil_cap" and the cap object is contained in the attachment Part_Exterior_Engine_L, which is attached to the main body of the aircraft in the Function_Exterior part with the alias "Engine_L":

The Engine_L attachment will have it's own attached_objects.cfg file with the following:
[SIM_ATTACHMENT.0]
attachment_root="SimAttachments/Aircraft_Objects/Asobo_Oil_DipStick_615"
attachment_file="model/Oil_DipStick_615.xml"
attach_to_model_minsize=1
attach_to_node="ATTACH_POINT_Oil_Dipstick_Left"
alias="OilDipstick_L"
behavior_parameter.0="OIL_CAP_ANIM_ID,'ENGINE_CAPS_OIL_1@Engine_L'"
The animation below shows the comparison between the cap and it's setup in the modeling software, and the final result with the dipstick sim attachment:

Related Topics